The Hardened Node: A Phased Defense for Independent Computing
The Philosophy of the Independent Node
In the modern web landscape, every public-facing server is under constant, automated surveillance. For those of us building an independent lab on salvaged hardware, the goal isn’t necessarily to become an invisible ghost, but to become an “expensive” target. Most automated attacks are looking for low-hanging fruit—default logins, unpatched vulnerabilities, and high-value data.
By explicitly declaring that our node carries no proprietary data and possesses no commercial product, we immediately devalue ourselves in the eyes of an attacker. We are shifting the narrative from being a vulnerable vault to being a transparent broadcast station for ideas. Hardening your site is a process of layering. It begins with clear communication of intent—what we call an Operating Logic statement—and moves into technical barriers that force an attacker to expend more effort than your data is worth.
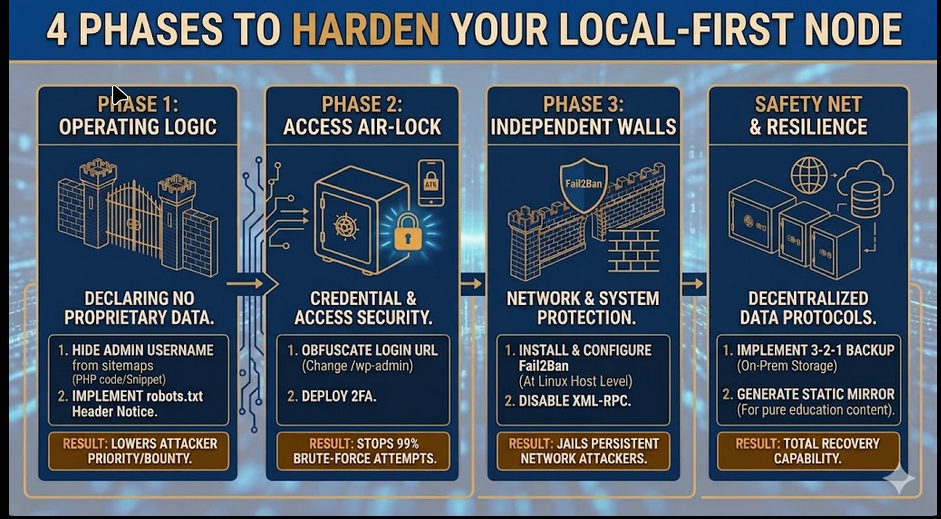
Phase 1: Logic & Intent
Target: Automated bots and simple scrapers.
1. Hide Your Admin Username from Sitemaps
By default, WordPress lists your login name in the XML sitemap. You can implement a fix by telling the site to ignore the admin ID while keeping other authors visible.
The Fix: Add this to your functions.php file (or via a “Code Snippets” plugin).
PHP
add_filter( 'wp_sitemaps_users_query_args', function( $args ) {
    $args['exclude'] = array( 1 ); // Replace '1' with your actual User ID
    return $args;
} );
2. Implement the “No Value” Protocol
Establish a clear psychological deterrent by stating the site carries no financial or proprietary data. This public notice informs human researchers that there is no “bounty” on this server.
The Fix: Add the following to the very top of your robots.txt file.
Plaintext
# NOTICE: This site is a non-commercial educational mirror.
# No proprietary or sensitive user data is stored on this server.
# All technical information is sourced from the public web.
Phase 2: The Air-Lock (Access Control)
Target: Brute-force attacks and credential stuffing.
1. Obfuscate the Front Door
Moving the login page makes the site “invisible” to 99% of automated login attempts that are hard-coded to look for /wp-admin.
The Fix: Use a plugin like WPS Hide Login to change the login URL to a custom slug (e.g., /node-access).
2. Deploy Two-Factor Authentication (2FA)
Even if a bot guesses your password, they cannot bypass a physical token or app-based code. This is the single most effective barrier for an independent node.
The Fix: Install a plugin like Wordfence or WP 2FA and link it to an authenticator app on your phone.
Phase 3: The Castle Walls (System Hardening)
Target: Network-level intrusions and persistent attackers.
1. Install Fail2Ban (Host Level)
Since you are running on a Linux host, you can stop attackers at the system level before they even reach WordPress. Fail2Ban monitors logs and “jails” IPs that show malicious patterns.
The Fix: Install Fail2Ban on your host via the terminal.
Bash
sudo apt update && sudo apt install fail2ban
2. Disable XML-RPC
XML-RPC is a legacy feature often exploited by bots to test thousands of password combinations in a single request. If you don’t post via the mobile app, shut it down.
Phase 4: Safety Net (Resilience)
Target: Total system failure or successful compromise.
1. The 3-2-1 Backup Strategy
A site is only as secure as its most recent backup. In an independent stack, your backups should be stored off-host (e.g., on a separate NAS unit) so a compromised web server doesn’t mean a total loss of data.
2. Static Mirroring
For pure educational content, consider generating a static HTML version of your site. A static site has no database and no PHP to hack, making it virtually unhackable.
The Fix: Use a plugin like Simply Static to create a secure, logic-free mirror of your node.